Security
🔒 Ensuring the security of your data
The Security area is responsible for controlling user access within the platform.
Here you can create customized profiles, organize user groups, configure access grids, and even export Takeout documents for auditing.
Each function and permission defined in this module has a direct impact on what the user will be able to view or execute in the system.
Therefore, careful management of this area ensures not only security, but also organization and operational efficiency.
Profile Management
The Profile Management menu is where profiles that control access permissions within the platform are created, edited, and viewed.
Each profile groups functions and permissions, ensuring that each user has access only to what is necessary for their activities.
This screen is the central point of security management, allowing everything from the creation of simple profiles (such as support agents) to advanced profiles (such as system administrators).
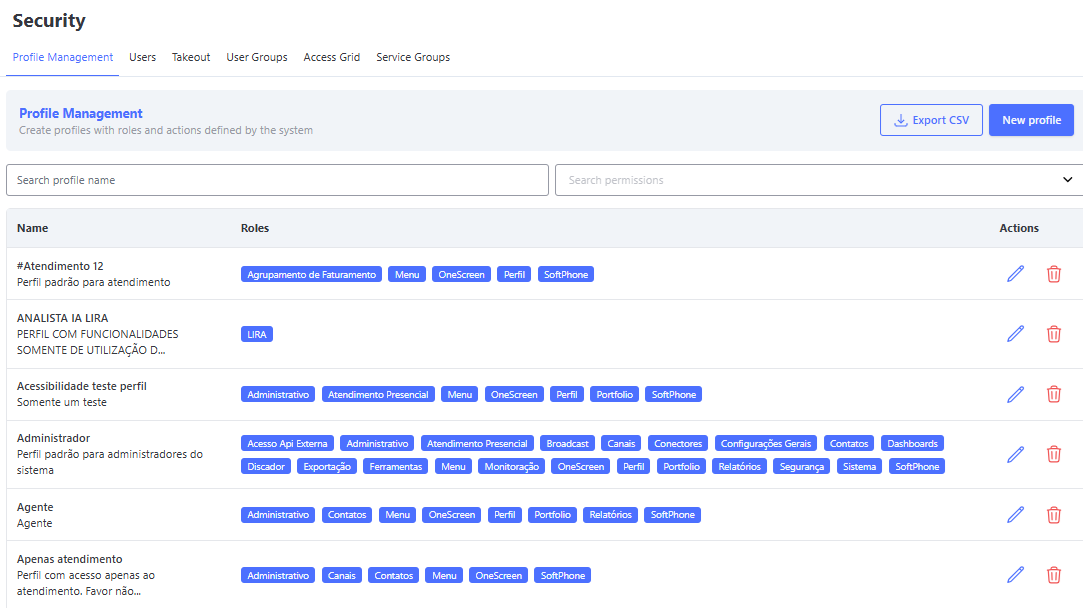
📋 What you can do on this screen
-
Create new profiles
Define name, description, and select functions with their respective permissions.
Example: A Support profile may include functions such as OneScreen, Contacts, and SoftPhone. -
View existing profiles
The list shows all registered profiles, including the system’s default profiles (such as Administrator). -
Export profiles in CSV
Allows generating a file with profile information for auditing or external control. -
Edit profiles
Adjust functions, permissions, name, and description of already created profiles. -
Delete profiles
Profiles that are no longer needed can be removed, ensuring better organization.
Creating a New Profile
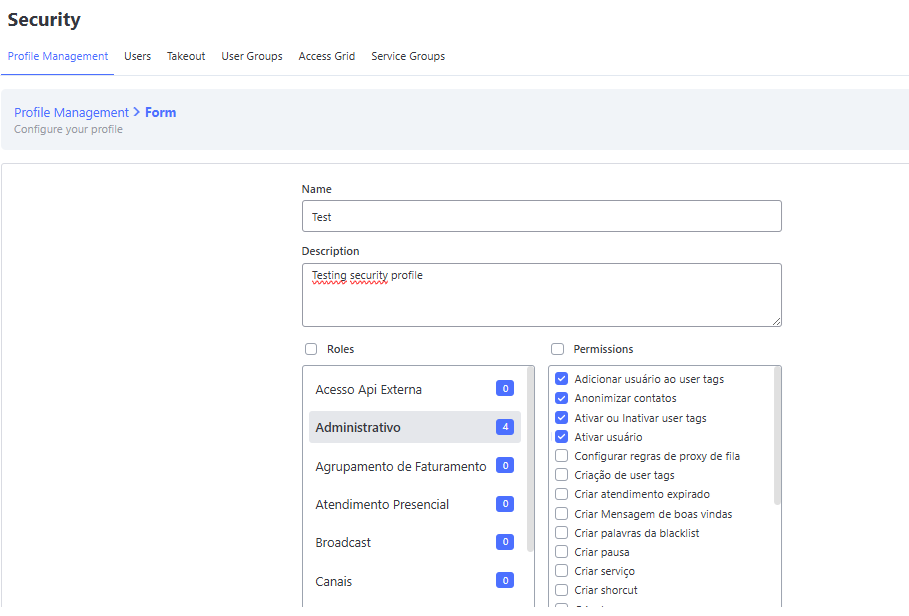
- Click New Profile.
- Fill in the required fields:
- Name: Identification of the profile.
- Description: Contextualize the purpose of the profile.
- Select the necessary Functions (Administrative, Broadcast, Channels, etc).
- Within each function, mark the specific Permissions (create, edit, delete, list...).
- Click Create to save.
💡 Tip: Well-structured profiles make support easier and prevent access issues. Create specific profiles for each area (e.g., Support, Management, Administration).
🔍 Practical Example
-
Attendance Profile
Functions: OneScreen, Contacts, SoftPhone.
Usage: Support agents who need to interact with clients, send messages, and manage contacts. -
Administrator Profile
Functions: All available.
Usage: System administrators with full access to all modules and settings.
💡 After creation, the profile will already be available to be assigned to one or more users.
Functions
Functions represent specific areas of the system, each with its own permissions.
Correctly defining functions in a profile is essential to control access and ensure that each user sees only what is necessary for their routine.
📌 Practical Example:
- The OneScreen function grants access to the support screen, with permissions to send messages, attach files, or close attendances.
- The Reports function grants access to analytical reports and CSV exports.
Below, you will find detailed documentation of each function and its respective permissions.
External API
| FIELD | SCREEN | DESCRIPTION |
|---|---|---|
| External API Access | EXTERNAL API | Allows access and consumption of data from the external API, without direct impact on the platform. In case of questions about integrations or API usage, please refer to the official documentation. |
Administrative
| FIELD | SCREEN | DESCRIPTION |
|---|---|---|
| Add User to User Tags | USER TAGS | Allows linking users to an existing User Tag in the Administrative > User Tag screen, facilitating profile segmentation. |
| Anonymize Contacts | CONTACTS | Encrypts all data of a contact in the Contacts/My Contacts screen. |
| Activate or Deactivate User Tags | USER TAGS | Allows activating or deactivating User Tags registered in the Administrative > User Tag screen, controlling their availability for filters and segmentations. |
| Activate User | USERS | Allows reactivating already registered users in the Administrative > Users screen, restoring their access to the system. |
| Create User Tags | USER TAGS | Allows registering new User Tags in the Administrative > User Tag screen, used to classify and group users. |
| Create Expired Attendance Rule | EXPIRED ATTENDANCES | Allows registering new expiration rules in the Administrative > Expired Attendances screen, defining criteria that automatically close attendances when no interaction occurs within the configured time. |
| Create Welcome Message | WELCOME MESSAGE | Allows registering automatic welcome messages in the Administrative > Welcome Message screen, used at the start of an attendance. |
| Create Blacklist Words | WORD BLACKLIST | Allows registering terms or expressions in the Administrative > Word Blacklist screen, blocking their use in attendances. |
| Create Pause | PAUSES | Allows registering new pauses in the Administrative > Pauses screen, used to control agent availability. |
| Create Service | SERVICES | Allows registering new services in the Administrative > Services screen, organizing attendance distribution. |
| Create Shortcut | SHORTCUTS | Allows registering shortcuts in the Administrative > Shortcuts screen, speeding up responses during attendances. |
| Create Tag | TAGS | Allows registering new tags in the Administrative > Tags screen, used for attendance tabulation. |
| Create User | USERS | Allows registering new users in the Administrative > Users screen, controlling system access. |
| Create/Edit Surveys | SURVEY FLOW | Allows creating or editing satisfaction surveys in the Administrative > Survey screen, collecting client feedback. |
| Delete User Tags | USER TAGS | Allows deleting User Tags in the Administrative > User Tag screen, removing unused segmentation groups. |
| Edit User Tags | USER TAGS | Allows editing information of already registered User Tags in the Administrative > User Tag screen, keeping user groupings updated. |
| Edit Expired Attendance Rule | EXPIRED ATTENDANCES | Allows editing expiration rules in the Administrative > Expired Attendances screen, adjusting criteria for closing interactions. |
| Edit Company | COMPANY | Allows editing company registration information in the Administrative > Company screen, ensuring institutional data is updated. |
| Edit Welcome Message | WELCOME MESSAGE | Allows editing welcome messages in the Administrative > Welcome Message screen, customizing automatic texts sent to clients. |
| Edit Blacklist Words | WORD BLACKLIST | Allows editing terms already registered in the Administrative > Word Blacklist screen, adjusting restrictions. |
| Edit Pause | PAUSES | Allows editing pauses already registered in the Administrative > Pauses screen. |
| Edit Service | SERVICES | Allows editing services already registered in the Administrative > Services screen, modifying attendance configurations. |
| Edit Shortcut | SHORTCUTS | Allows editing shortcuts already registered in the Administrative > Shortcuts screen, keeping quick responses updated. |
| Edit Tag | TAGS | Allows editing tags already registered in the Administrative > Tags screen, updating tabulation terms. |
| Edit User | USERS | Allows editing already registered users in the Administrative > Users screen, including profile data or permissions. |
| Export Users to CSV | USERS | Allows exporting users in CSV format in the Administrative > Users screen, useful for reports and audits. |
| Manage Company Services | SERVICES | Allows activating or deactivating services already registered in the Administrative > Services screen, controlling availability. |
| List Expired Attendances | EXPIRED ATTENDANCES | Allows viewing the list of expiration rules in the Administrative > Expired Attendances screen, with details of configured deadlines. |
| List Companies | COMPANY | Allows viewing the list of companies registered in the Administrative > Company screen, with general registration information. |
| List Welcome Messages | WELCOME MESSAGE | Allows viewing welcome messages registered in the Administrative > Welcome Message screen. |
| List Blacklist Words | WORD BLACKLIST | Allows viewing terms registered in the Administrative > Word Blacklist screen, checking active restrictions. |
| List Pauses | PAUSES | Allows viewing the list of pauses registered in the Administrative > Pauses screen. |
| List Surveys | SURVEY FLOW | Allows viewing surveys already registered in the Administrative > Survey Flow screen. |
| List Services | SERVICES | Allows viewing the list of services registered in the Administrative > Services screen. |
| List Shortcuts | SHORTCUTS | Allows viewing the list of shortcuts registered in the Administrative > Shortcuts screen. |
| List Tags | TAGS | Allows viewing the list of tags registered in the Administrative > Tags screen. |
| List User Tags | USER TAGS | Allows viewing the list of User Tags in the Administrative > User Tag screen. |
| List Users | USERS | Allows viewing the list of users registered in the Administrative > Users screen. |
| Menus (Expired Attendances, Company, Welcome Messages, Pauses, Services, Shortcuts, Tags, Users, User Tags) | ADMINISTRATIVE | Provides access to menus with search, filters, and visualization for each respective area. |
| Remove User from User Tags | USER TAGS | Allows unlinking users from a User Tag in the Administrative > User Tag screen, adjusting groupings. |
In-Person Service
| FIELD | SCREEN | DESCRIPTION |
|---|---|---|
| In-Person Service | SERVICE | Enables the In-Person Service button on the Service screen, allowing registration of face-to-face interactions by linking the contact, service, and service notes. |
Broadcast
| FIELD | SCREEN | DESCRIPTION |
|---|---|---|
| Broadcast Campaign Creation | CAMPAIGN | Allows creating campaigns in the Broadcast > Campaign screen, configuring the sending channel, integrated number, and associated service. |
| Broadcast Sending Creation | SENDINGS | Allows accessing the Broadcast > Sendings screen to schedule and monitor mass message deliveries from campaigns. |
| Broadcast Contact Group | CONTACT GROUP | Allows accessing the Broadcast > Contact Group screen to create or manage contact groups via CSV import or manual selection. |
Channels
| FIELD | SCREEN | DESCRIPTION |
|---|---|---|
| Configure Boteria | INTEGRATIONS | Allows creating, editing, and deleting integration channels with Boteria (chats). |
| Configure Consumidor Gov | CHANNELS | Allows creating, editing, and deleting integration channels with Consumidor.gov.br, connecting official attendances. |
| Configure Email | CHANNELS | Allows creating, editing, and deleting integration channels with Email, for sending and receiving messages. |
| Configure Facebook | CHANNELS | Allows creating, editing, and deleting integration channels with Facebook, linking the company page to the system. |
| Configure Instagram | CHANNELS | Allows creating, editing, and deleting integration channels with Instagram, enabling direct interactions via the social network. |
| Configure Mercado Livre | CHANNELS | Allows creating, editing, and deleting integration channels with Mercado Livre, linking the account for message management. |
| Configure RD Station | CHANNELS | Allows creating, editing, and deleting integration channels with RD Station. |
| Configure Reclame Aqui | CHANNELS | Allows creating, editing, and deleting integration channels with Reclame Aqui, enabling management of received complaints. |
| Configure Phone | CHANNELS | Allows creating and editing IVR in the phone screen — insert new services, edit pre-service phrases, or import audio files. |
| Configure Telegram | CHANNELS | Allows creating, editing, and deleting integration channels with Telegram. |
| Configure Twitter | CHANNELS | Allows creating, editing, and deleting integration channels with Twitter. |
| Configure WhatsApp | CHANNELS | Allows creating, editing, and deleting integration channels with WhatsApp, including enabling previously authorized HSM. |
| List Channels | CHANNELS | Allows viewing the list of all channels available in the organization. |
| View Media Dashboard | DASHBOARD | Allows accessing and applying filters in Chat Dashboards, monitoring results of sent messages. |
| View Phone Dashboard | DASHBOARD | Allows accessing and applying filters in IVR Dashboards, monitoring calls and associated metrics. |
Connectors
| FIELD | SCREEN | DESCRIPTION |
|---|---|---|
| Configure Google Forms | INTEGRATIONS | Allows integrating and embedding Google Forms into the platform, connecting responses to service flows. |
| Configure Your Forms | INTEGRATIONS | Allows integrating and embedding Your Forms into the platform, connecting responses to service flows. |
General Settings
| FIELD | SCREEN | DESCRIPTION |
|---|---|---|
| Create and Edit WhatsApp Channel | CHANNELS | Allows creating and editing integration channels with WhatsApp directly in the Channels screen, adjusting links and usage settings. |
| Create and Edit Phone Number | CHANNELS | Allows registering and editing Phone Numbers in the Channels screen, linking them to services and IVR configurations. |
Contacts
| FIELD | SCREEN | DESCRIPTION |
|---|---|---|
| Activate Contact | CONTACTS | Allows changing the status of a contact between Active and Inactive in the Contacts > My Contacts screen. |
| Create Blacklist | BLACKLIST | Allows adding new numbers in the Contacts > Blacklist screen. |
| Create Contact | CONTACTS | Allows registering new contacts in the Contacts > My Contacts screen. |
| Delete Blacklist | BLACKLIST | Allows removing numbers registered in the Contacts > Blacklist screen. |
| Edit Blacklist | BLACKLIST | Allows editing numbers already registered in the Contacts > Blacklist screen. |
| Edit Contact | CONTACTS | Allows editing information of an existing contact in the Contacts > My Contacts screen. |
| Import Contacts | CONTACTS | Allows importing contacts via CSV file in the Contacts > My Contacts screen. |
| List Blacklist | BLACKLIST | Allows viewing the list of numbers registered in the Contacts > Blacklist screen. |
| List Contacts | CONTACTS | Allows viewing the list of contacts registered in the Contacts > My Contacts screen. |
| Blacklist Menu | BLACKLIST | Provides access to the Contacts > Blacklist menu, with search and filters. |
| Contacts Menu | CONTACTS | Provides access to the Contacts > My Contacts menu, with search and filters. |
Dashboards
| FIELD | SCREEN | DESCRIPTION |
|---|---|---|
| Broadcast Dashboard | BROADCAST | Allows accessing the Broadcast > Dashboard screen, monitoring metrics, results, and campaign filters. |
| Survey Dashboard | PANEL | Allows accessing the Panel > Survey screen, monitoring satisfaction survey results with visualization and filters. |
| Dialer Dashboard | PANEL | Allows accessing the Panel > Dialer screen, viewing metrics and filters of automated calls. |
| WhatsApp Dashboard | PANEL | Allows accessing the Panel > WhatsApp screen, monitoring metrics and results. |
| Inbound Service View | PANEL | Allows accessing the Panel > Inbound screen, with visualization and filters of received calls. |
| Omni Service View | PANEL | Allows accessing the Panel > Omni View screen, consolidating indicators from multiple channels. |
| Omni Service View (Mobile Version) | PANEL | Allows accessing the Panel screen, viewing indicators via the mobile application. |
| Outbound Service View | PANEL | Allows accessing the Panel > Outbound screen, with visualization and filters of performed calls. |
| Inbound Voice Services View | PANEL | Allows accessing the Panel > IVR screen, monitoring specific metrics of inbound voice services. |
Dialer
| FIELD | SCREEN | DESCRIPTION |
|---|---|---|
| Dialer Integration Button on Screen | DIALER | Allows displaying and using the integration button directly on the Dialer screen, speeding up access to functionalities. |
| Dialer Campaign Creation | DIALER | Allows accessing the Dialer > Campaign screen to create dialing campaigns with service parameters. |
| Dialer Strategy Creation | DIALER | Allows accessing the Dialer > Strategy screen to configure dialing rules and call distribution. |
| Dialer Product Creation | DIALER | Allows registering new products in the Dialer > Products screen, linking them to campaigns or strategies. |
| Dialer End Call | DIALER | Allows ending calls directly in the Dialer during an active interaction. |
| Dialer Product Editing | DIALER | Allows editing products already registered in the Dialer > Products screen, adjusting information and existing links. |
| Dialer Contact Group | DIALER | Allows managing contact groups in the Dialer > Contact Group screen, creating and organizing dialing lists. |
| Dialer Product Group | DIALER | Allows managing product groups in the Dialer > Product Group screen. |
| Dialer Product List | DIALER | Allows viewing the list of products registered in the Dialer > Products screen, with search and filters available. |
| Dialer Make Call | DIALER | Allows originating calls directly from the Dialer. |
| Dialer Call Transfer | DIALER | Allows transferring ongoing calls to another agent or service in the Dialer. |
Export
| FIELD | SCREEN | DESCRIPTION |
|---|---|---|
| Delete Report | EXPORTS | Allows deleting exported reports in the Exports screen, removing CSV files that are no longer needed. |
| Create New Export | EXPORTS | Allows generating new reports in the Exports screen, based on available system data. |
| Broadcast Contact Group Report | EXPORTS | Allows generating a report of the import history of Broadcast Contact Groups in the Exports screen. |
| Broadcast Consolidated/Detailed Report | EXPORTS | Allows generating consolidated or detailed reports with information on Broadcast sendings, accessed in the Exports screen. |
| Dialer Effective Contacts Report | EXPORTS | Allows generating a report with effective contacts worked by the Dialer. |
| Survey Report | EXPORTS | Allows generating a report with the results of Satisfaction Surveys. |
| User/Calls/Activity Report | EXPORTS | Allows generating a report with analytical data of users, calls (inbound/outbound), and activities, accessed in Exports. |
| Dialer Contact Group Report | EXPORTS | Allows generating an exported report of the import history of Dialer Contact Groups, accessed in Exports. |
Tools
| FIELD | SCREEN | DESCRIPTION |
|---|---|---|
| HSM Template Creation | TOOLS | Allows creating new HSM templates in the Tools > HSM Template Linking screen, used in approved WhatsApp messages. |
| SMS Template Creation | TOOLS | Allows creating new SMS templates in the Tools > SMS Template Management screen, used in campaigns and automated sendings. |
| Delete HSM Template | TOOLS | Allows deleting HSM templates already registered in the Tools > HSM Template Linking screen. |
| Delete SMS Template | TOOLS | Allows deleting SMS templates already registered in the Tools > SMS Template Management screen. |
| Edit SMS Template | TOOLS | Allows editing SMS templates already registered in the Tools > SMS Template Management screen, adjusting content or rules. |
| Edit HSM Template | TOOLS | Allows editing HSM templates already registered in the Tools > HSM Template Linking screen, updating approved messages. |
| Form Management | TOOLS | Allows creating and editing custom forms in the Tools > Forms screen, used in service flows. |
| Mass Service Management | TOOLS | Allows executing batch actions in the Tools > Mass Management screen, such as closing or reassigning multiple attendances simultaneously. |
| HSM Template List | TOOLS | Allows viewing the list of HSM templates in the Tools > HSM Template Linking screen. |
| SMS Template List | TOOLS | Allows viewing the list of SMS templates in the Tools > SMS Template Management screen. |
| Queue Management Menu | TOOLS | Allows accessing the Tools > Queue Management screen. |
| SMS Template Management Menu | TOOLS | Allows accessing the Tools > SMS Template Management screen. |
| Mass Management Menu | TOOLS | Allows accessing the Tools > Mass Management screen. |
| HSM Template Linking Menu | TOOLS | Allows accessing the Tools > HSM Template Linking screen. |
Menu
| FIELD | SCREEN | DESCRIPTION |
|---|---|---|
| Access Administrative Module | ADMINISTRATIVE | Allows access to the Administrative menu, where company, user, service, tag, shortcut, and pause settings are managed. |
| Access Broadcast Module | BROADCAST | Allows access to the Broadcast menu, responsible for managing campaigns, contact groups, and sendings. |
| Access Channels Module | CHANNELS | Allows access to the Channels menu, where communication integrations (WhatsApp, Email, etc.) are configured. |
| Access Connectors Module | INTEGRATIONS | Allows access to the Integrations menu, responsible for integrating external forms (Google Forms, Your Forms). |
| Access Contacts Module | CONTACTS | Allows access to the Contacts menu, including submenus for contacts and blacklist. |
| Access Dashboards Module | PANEL | Allows access to the Panel menu, with a consolidated view of service and channel indicators. |
| Access Dialer Module | DIALER | Allows access to the Dialer menu, where campaigns, strategies, groups, and automated calls are configured. |
| Access Exports Module | EXPORTS | Allows access to the Exports menu, used to generate reports in CSV format. |
| Access Tools Module | TOOLS | Allows access to the Tools menu, which manages templates (SMS/HSM), queues, and mass actions. |
| Access Labs Module | LABS | Allows access to the Labs menu. |
| Access Monitoring Module | MONITORING | Allows access to the Monitoring menu, to track attendances in queue, ongoing, or by agent. |
| Access Reports Module | REPORTS | Allows access to the Reports menu, where analytical system reports can be generated and consulted. |
| Access Security Module | SECURITY | Allows access to the Security menu, responsible for managing profiles, user groups, and permissions. |
| Access SoftPhone | SOFTPHONE | Allows access to the SoftPhone, used to make and receive calls directly in the platform. |
| Access Service Screen | SERVICE | Allows access to the main Service screen, where agents interact with contacts in real time. |
| Search Contact | CONTACTS | Allows using the contact search in the Contacts screen to quickly locate records. |
Monitoring
| FIELD | SCREEN | DESCRIPTION |
|---|---|---|
| Log out user | MONITORING | Allows forcing a user logoff in the Monitoring > Agents screen, ending their active session. |
| Send message in a service | MONITORING | Allows inserting an internal comment in a service in the Monitoring > Service screen. |
| End a service | MONITORING | Allows closing an ongoing service in the Monitoring > Service screen. |
| Monitor and manage services | MONITORING | Allows viewing, tracking, and interacting with active services in the Monitoring > Service screen. |
| Take over a call | MONITORING | Allows retrieving a call in the Monitoring > Agents screen, taking over the agent’s call. |
| Listen to a call | MONITORING | Allows passively monitoring a call in real time in the Monitoring > Agents screen. |
| Listen and speak in a call | MONITORING | Allows joining a call conference in the Monitoring > Agents screen, interacting alongside the agent and contact. |
| Transfer service to another service | MONITORING | Allows transferring ongoing services to another service in the Monitoring > Service screen. |
| Transfer service to another user | MONITORING | Allows transferring ongoing services to another user in the Monitoring > Service screen. |
| Agents dashboard view | MONITORING | Allows viewing the Monitoring > Agents dashboard. |
| Service dashboard view | MONITORING | Allows viewing the Monitoring > Service dashboard. |
| Agents view in service system | MONITORING | Allows viewing agents in the Monitoring > Service screen by enabling the Show Details flag. |
OneScreen (Attendance)
| FIELD | SCREEN | DESCRIPTION |
|---|---|---|
| Access scheduling list | ATTENDANCE | Allows accessing the Scheduling list in the Attendance screen, viewing scheduled interactions. |
| Access Attendance list | ATTENDANCE | Allows accessing the list of Ongoing Attendances in the Attendance screen. |
| Access history list | ATTENDANCE | Allows accessing the History list in the Attendance screen, consulting completed interactions. |
| Access active scheduling | ATTENDANCE | Allows creating schedules in the Attendance > Quick Send screen, programming message sendings. |
| Access active sending | ATTENDANCE | Allows accessing the Attendance > Quick Send screen, viewing and managing mass sendings. |
| Attach files in a Attendance | ATTENDANCE | Allows attaching files directly in the Attendance screen during contact interaction. |
| Block GIF sending | ATTENDANCE | Allows restricting the sending of GIFs during interactions in the Attendance screen. |
| Edit Google Forms | ATTENDANCE | Allows editing integrated Google Forms in the Attendance screen. |
| Edit Your Forms | ATTENDANCE | Allows editing integrated Your Forms in the Attendance screen. |
| Send message in a Attendance | ATTENDANCE | Allows sending messages during an interaction in the Attendance screen. |
| Download message audio | ATTENDANCE | Allows downloading audio files received or sent during a Attendance in the Attendance screen. |
| End a Attendance | ATTENDANCE | Allows officially closing interactions in the Attendance screen. |
| Manage contact | ATTENDANCE | Allows managing contact data directly in the Attendance screen, editing or updating information. |
| Transfer Attendance to another Attendance | ATTENDANCE | Allows transferring the Attendance to another Attendance directly in the Attendance screen. |
| Transfer Attendance to another user | ATTENDANCE | Allows transferring the Attendance to another User directly in the Attendance screen. |
| View message shortcuts in Attendance | ATTENDANCE | Allows viewing and using Shortcuts (message templates) in the Attendance screen. |
Profile
| FIELD | SCREEN | DESCRIPTION |
|---|---|---|
| Change Notifications | PROFILE | Allows enabling or disabling sound and visual notifications, configured directly from the left sidebar. |
| Switch Company | PROFILE | Allows switching between different companies linked to the user, via the left sidebar. |
| View My Dashboard | PANEL | Allows accessing the Panel > My View screen, displaying personalized indicators for the user. |
Portfolio
| FIELD | SCREEN | DESCRIPTION |
|---|---|---|
| View only assigned contacts (for the agent) | CONTACTS | Allows the user to view only the assigned contacts linked to them in the Contacts screen. |
| View all contacts | CONTACTS | Allows the user to view all company contacts in the Contacts screen. |
Reports
| FIELD | SCREEN | DESCRIPTION |
|---|---|---|
| Block CSV download of interaction tracking | REPORTS | Allows blocking the CSV download of interaction tracking records. |
| Export contact history | CONTACTS | Allows exporting CSV files of contacts registered in the system. |
| Export interaction history | REPORTS | Allows exporting CSV files of data recorded in the interaction report. |
| Download message audio | REPORTS | Allows downloading audio files sent and received during interactions. |
| View Interaction Report | REPORTS | Allows generating and viewing the Interaction Report, with details of messages and contacts. |
| View IVR Report | REPORTS | Allows generating and viewing the IVR Report, presenting call metrics. |
Security
Security
| FIELD | SCREEN | DESCRIPTION |
|---|---|---|
| Associate and disassociate profiles with users | SECURITY | Allows associating or removing profiles linked to users in the Security > Profile Management screen. |
| Register access schedules | SECURITY | Allows registering new Access Schedules in the Security > Access Schedules screen, used to control user work shifts. |
| Create a profile | SECURITY | Allows creating new access profiles in the Security > Profile Management screen, defining user permissions. |
| Delete a profile | SECURITY | Allows deleting access profiles already registered in the Security > Profile Management screen. |
| Edit access schedules and add/remove users from schedules | SECURITY | Allows editing existing Access Schedules and managing users linked to them in the Security > Access Schedules screen. |
| Edit a profile | SECURITY | Allows editing information and permissions of already created profiles in the Security > Profile Management screen. |
| Delete access schedules | SECURITY | Allows deleting Access Schedules registered in the Security > Access Schedules screen. |
| Delete user groups | SECURITY | Allows deleting user groups registered in the Security > User Groups screen. |
| Execute takeout | SECURITY | Allows executing Takeout (data extraction) of users, when enabled for auditing and export. |
| Export users to CSV | SECURITY | Allows exporting the user list in CSV format in the Security > Users screen. |
| Profile management menu | SECURITY | Allows access to the Profile Management menu. |
| Users menu | SECURITY | Allows access to the Users menu. |
| View created profiles | SECURITY | Allows viewing the list of profiles already created in the Security > Profile Management screen. |
| View and create user groups | SECURITY | Allows viewing and registering user groups in the Security > User Groups screen. |
| View access schedules | SECURITY | Allows viewing Access Schedules registered in the Security > Access Schedules screen. |
| View user groups | SECURITY | Allows viewing user groups already registered in the Security > User Groups screen. |
System
| FIELD | SCREEN | DESCRIPTION |
|---|---|---|
| Company Manager | SYSTEM | Defines the user as company administrator, granting extra permissions beyond standard settings. |
| Deactivate company | SYSTEM | Allows deactivating the company, blocking platform usage for associated users. |
| Set user with mobile access | SYSTEM | Allows granting user access to the mobile application, enabling service via smartphone. |
| Set user with multiple logins | SYSTEM | Allows the user to log in to up to two platforms simultaneously. |
| View user password | SYSTEM | Allows viewing the registered password of a user in the system. |
SoftPhone
| FIELD | SCREEN | DESCRIPTION |
|---|---|---|
| Create conference | SOFTPHONE | Allows creating a conference between calls directly in the SoftPhone. |
| End call | SOFTPHONE | Allows ending an ongoing call in the SoftPhone. |
| Make call | SOFTPHONE | Allows making new calls from the SoftPhone. |
| Pause call | SOFTPHONE | Allows placing a call on hold in the SoftPhone. |
| Transfer call | SOFTPHONE | Allows transferring ongoing calls to another agent or service. |
| View keypad | SOFTPHONE | Allows viewing and using the numeric keypad within the SoftPhone. |
Users
The Users menu within Security is the space dedicated to associating each user with the access profiles previously created in Profile Management.
This association ensures that each team member has the correct permissions for their daily activities, strengthening both security and operational organization of the platform.
💡 Tip: Profiles can be single or multiple. This way, the same user can accumulate administrative and operational access as needed.
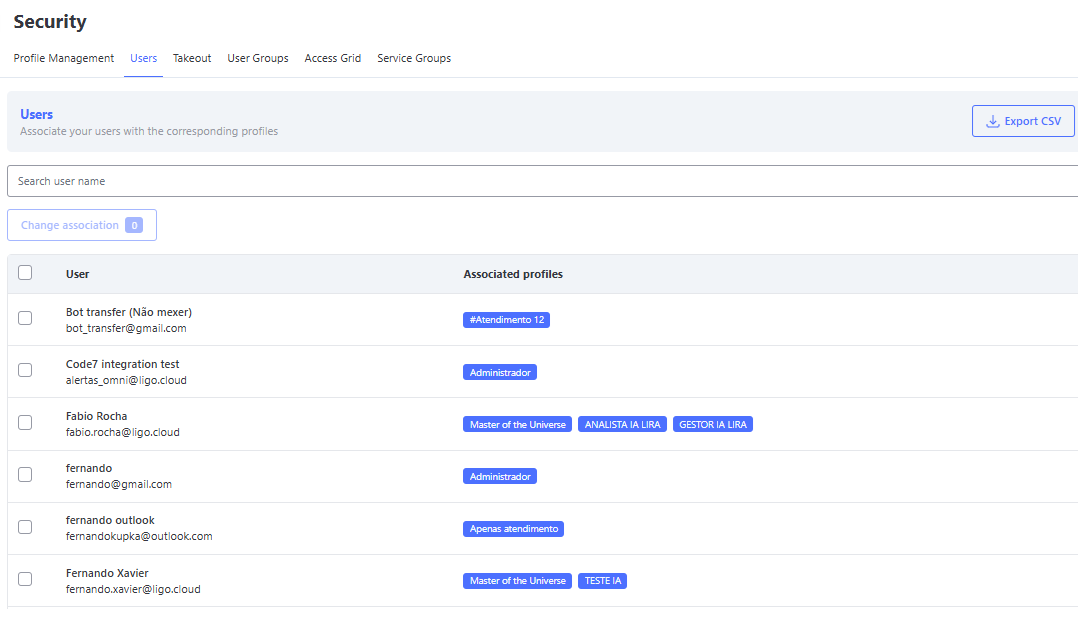
Main Features
-
🔍 User Search
Use the search field to quickly locate a specific user, avoiding the need to manually go through the entire list.⚠️ Important: The user must be previously registered in the Administrative > Users menu in order to be associated with a profile.
-
✅ Multiple Selection
It is possible to select one or more users at the same time, allowing profile changes to be applied in bulk efficiently.🔒 Security: Only the users selected in the list will have their permissions modified. This measure prevents accidental changes to non-selected profiles.
-
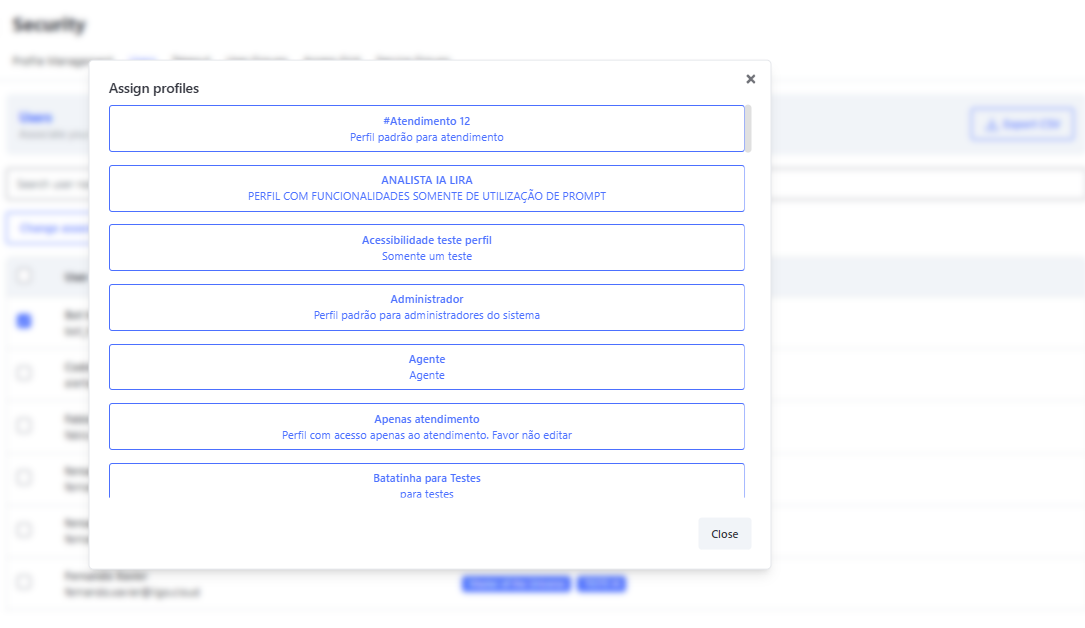
🔗 Profile Assignment
After selecting the users, the Change Association button allows:- Associate profiles → Link new access profiles to the user(s).
- Clear association → Remove linked profiles, leaving the user without access permissions.
⚠️ Important: When clearing a user’s associations, they will lose all access. To log into the system, the user must have at least one active profile associated.

- 📋 Viewing Assigned Profiles
When accessing the assignment screen, all available profiles are displayed. Simply select the desired ones to apply them.
A single user can have multiple profiles, depending on their responsibilities.
Benefits of Correct Association
- 🛡️ Ensures precise access control, allowing each user to see only what is relevant to their role.
- 📊 Facilitates permission auditing, providing greater transparency in access control.
- 🔄 Provides flexibility in configuration, enabling users to have multiple profiles according to their responsibilities.
- 🔒 Improves overall security, preventing unauthorized access to sensitive system features.
- ⚡ Increases efficiency in user management, allowing bulk adjustments with just a few clicks.
Takeout
Takeout - What is it?
Takeout is a feature in Omni that allows authorized users to perform a complete download of company data, including photos, videos, audios, messages, and associated records.
This feature is recommended for auditing, local backup, or integration with other external platforms.
⚠️ Important: Takeout is only available for profiles with explicit permission in the Security module.
How to extract the data
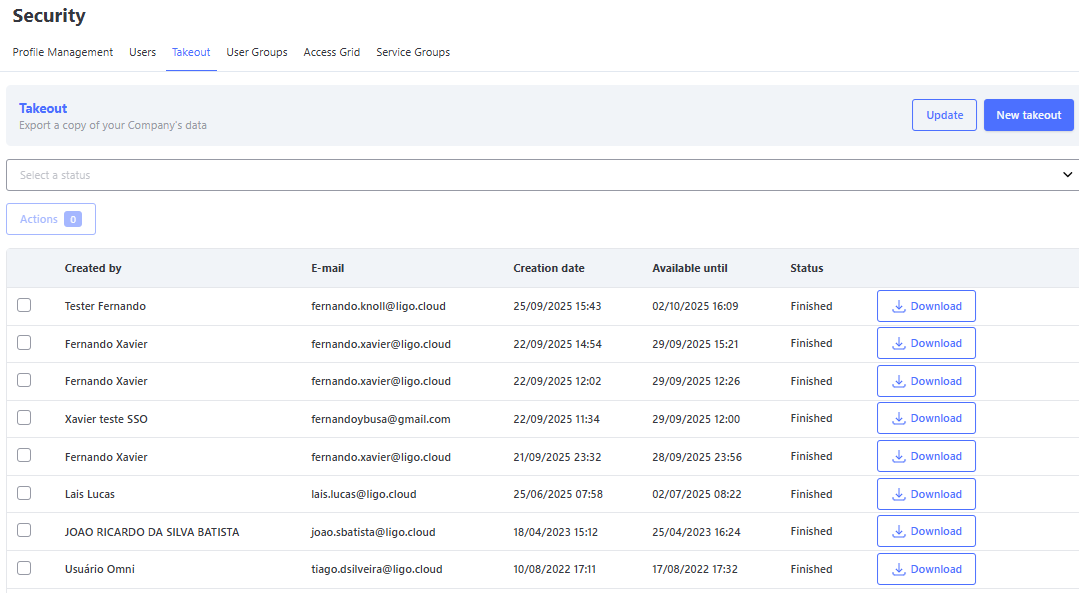
On the main screen, it is possible to:
- 🔄 Refresh the list to check ongoing requests.
- 🆕 Generate a new Takeout, starting the data export.
- 🎯 Apply filters by Status, making it easier to track requests.
- ⛔ Cancel an ongoing request.
- ♻️ Restart exports that failed (status Error).
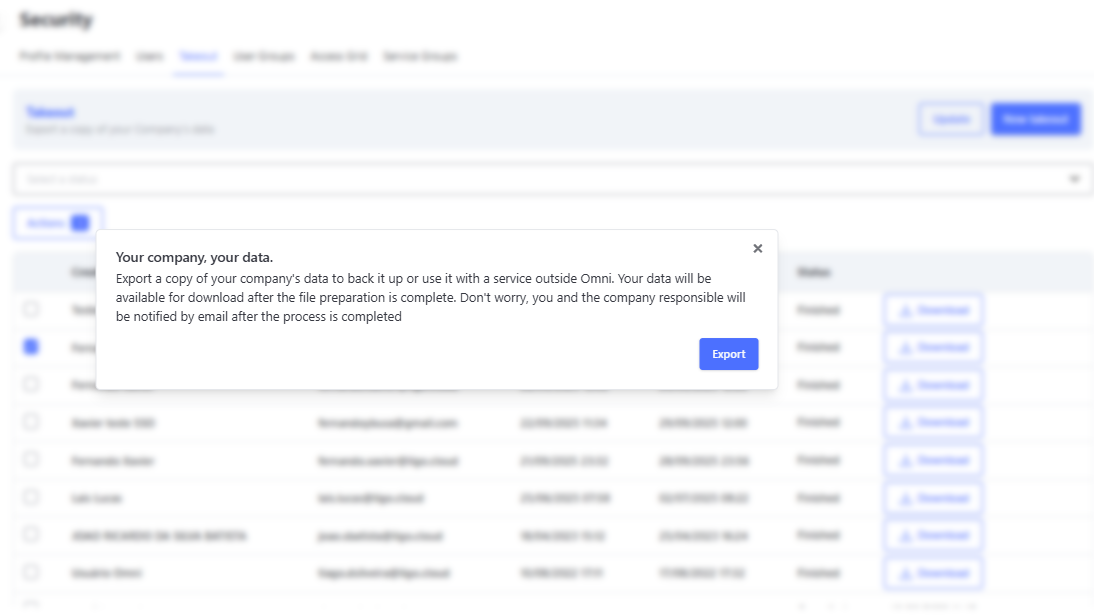
When clicking “New Takeout”, a window with the process details will be displayed.
Confirm the action by clicking Export → the request will appear in the list with the status Pending.
Status das Solicitações
The available statuses for tracking are:
- 🕒 Pending → The request has been created and the system is preparing the export.
- ⚙️ Processing → The export is in progress.
- ⛔ Canceled → The export was manually interrupted.
- ✅ Completed → The export was successfully finished.
- ❌ Error → A failure occurred during the export process.
💡 Tip:
- Requests with Completed status allow the file to be downloaded.
- Requests with Error status can be restarted.
File Download
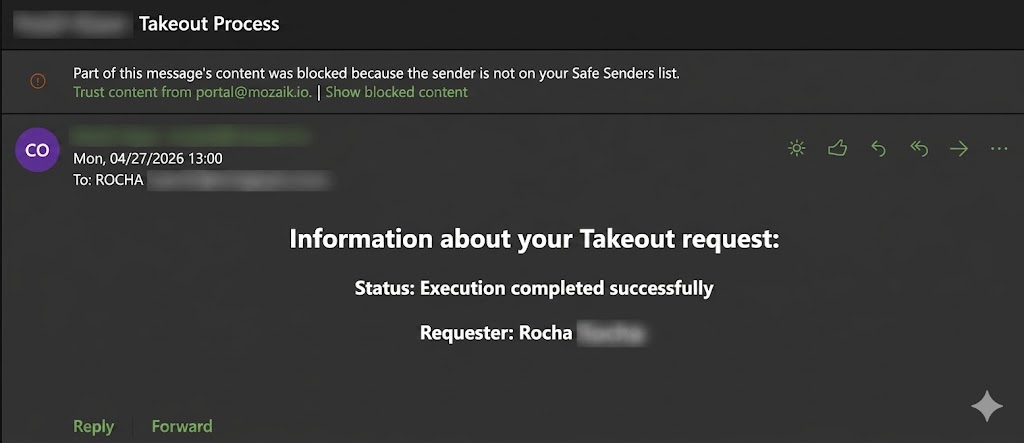
When the export is completed (Completed status), the system will send an automatic email to the company manager and the requesting user.
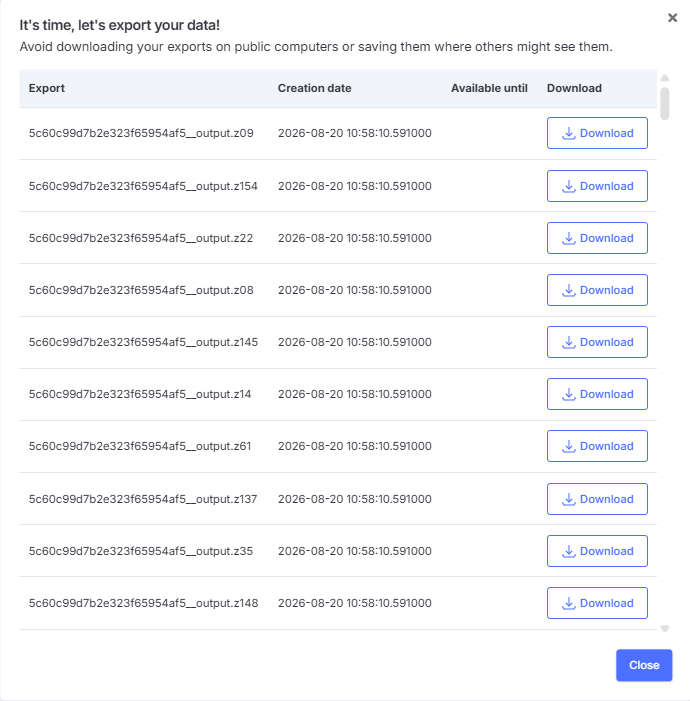
The provided file follows this pattern:
- It is a compressed file (ZIP).
- It is divided into smaller parts, which must be downloaded in full for proper extraction.
- After downloading, it is necessary to decompress the main file.
The data structure is organized as follows:
- 📑 Textual records → provided in JSON format.
- 🖼️ Images → stored in a dedicated folder.
- 🎥 Videos → stored in a dedicated folder.
- 🎵 Audios → stored in a dedicated folder.
⚠️ Important: If not all files are downloaded, the decompression process will be invalid and the data will be inaccessible.
User Groups
O módulo de Grupos de Usuários permite estruturar a operação em níveis hierárquicos bem definidos. Com essa organização, líderes e gestores passam a ter acesso direcionado e seguro às métricas e históricos exclusivos dos operadores sob sua alçada nos relatórios do sistema, garantindo governança e privacidade dos dados operacionais.
Tela Principal de Grupos de Usuários
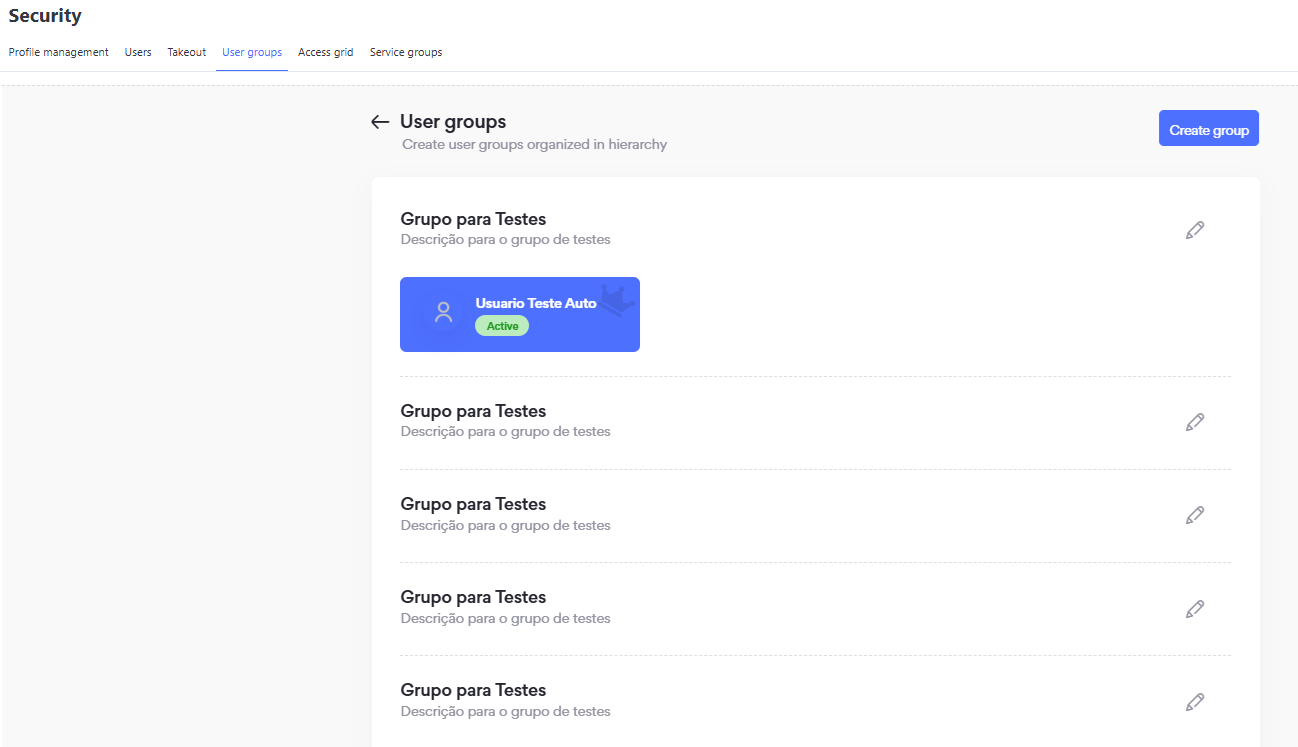
How to Create and Structure Groups
Creating a group follows simple steps directly within the interface:
- Click the "Create group" button.
- Fill in the Group name for identification in the list.
- Enter an objective Description regarding the scope or team for that group.
- Select the Administrator / Leader responsible for managing the team in the corresponding field.
- Confirm by clicking the "Create" button.
- Link the users and agents who will fall under the hierarchical subordination of this group.
User Group Creation and Editing
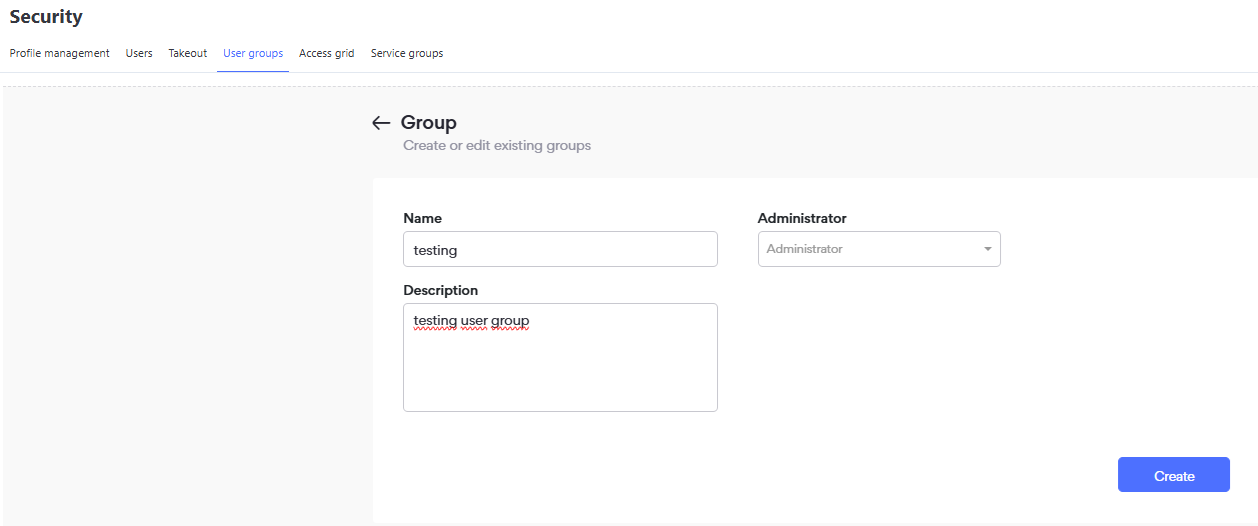
Management and Deletion of Groups
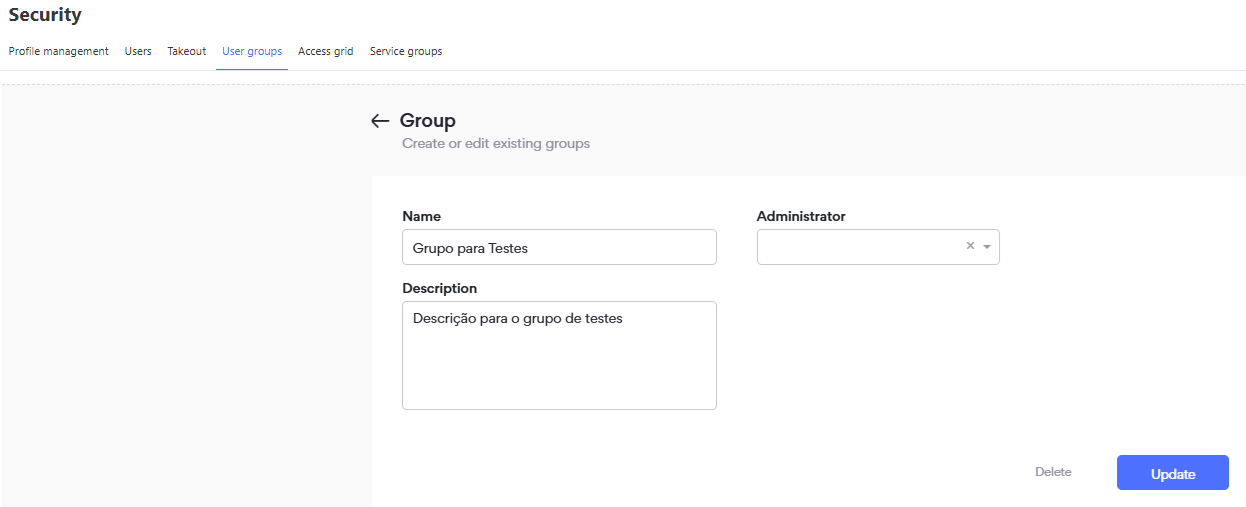
The administration of the hierarchical tree includes specific rules to preserve the consistency of the leadership structure:
- ✏️ Editing: Allows updating the group name and description at any time. To change or remove a leader, they must not have any users linked beneath them; if there are direct or indirect subordinates, the leadership field remains protected against editing.
- 🗑️ Removing Members in the Hierarchy: Users can only be unlinked individually if they are positioned at the end of the hierarchy branch (having no subordinates below them). As long as a user has members under their management, the individual trash icon will remain disabled for them.
- 🏢 General Group Deletion: The complete removal of the group can be performed directly via the trash icon in the card header, without needing to delete subordinates one by one beforehand. When deleting the group entirely, all users are automatically unlinked from the hierarchy.
User Group Deletion Confirmation
Access Grid
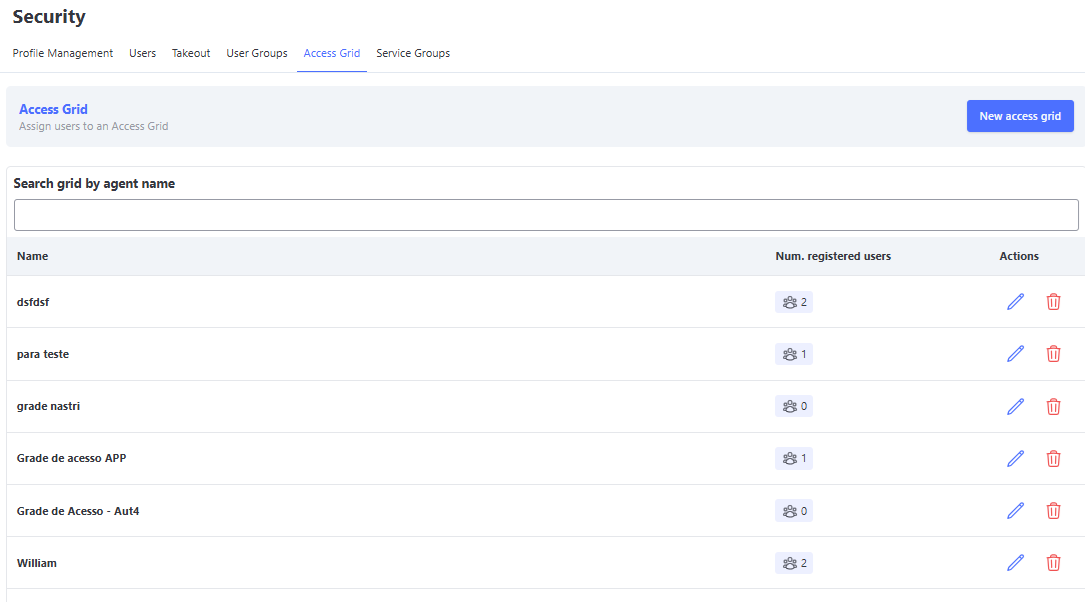
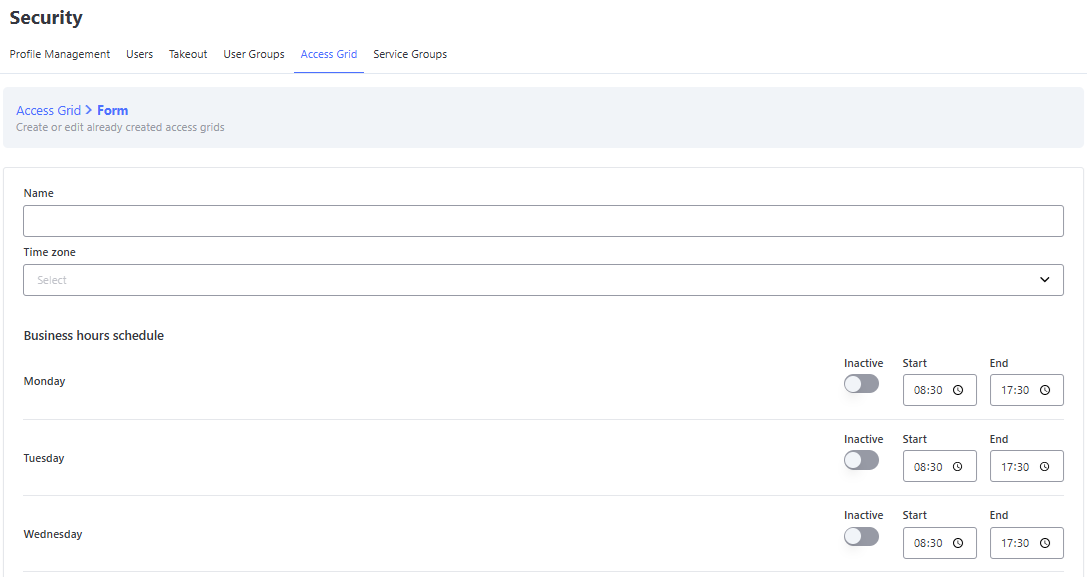
In the Access Grid module, you can define the days and times when your users are allowed to access the system according to the company’s needs, respecting its time zone.
On this screen, you can create new Access Grids and manage existing ones, adding or removing users, editing, or deleting them.
Screen: Access Grid
Access Grid Creation
- Click on "New Access Grid"
- Enter the Grid Name
- Select the Time Zone
- Enable or disable the weekdays. If disabled, users will not be able to log in on that day, even if a time window is configured
- Configure the time window during which users can access the system
- Select whether to enable automatic transfer of services
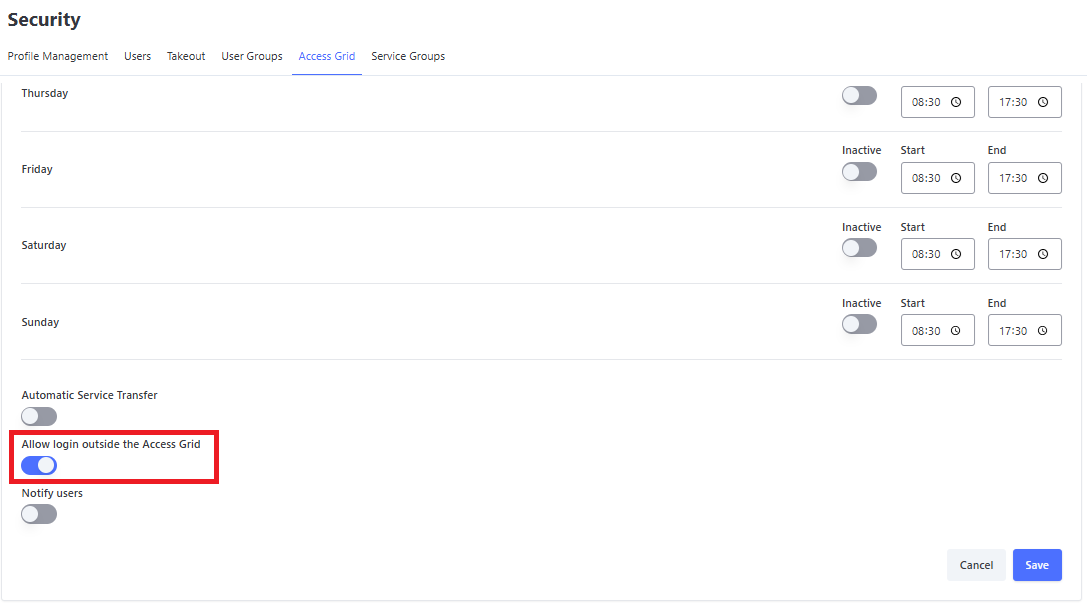
- Select whether to allow the user to log in outside the defined Grid
- Click on "Save"
Creating Access Grid
Registering Users in the Access Grid
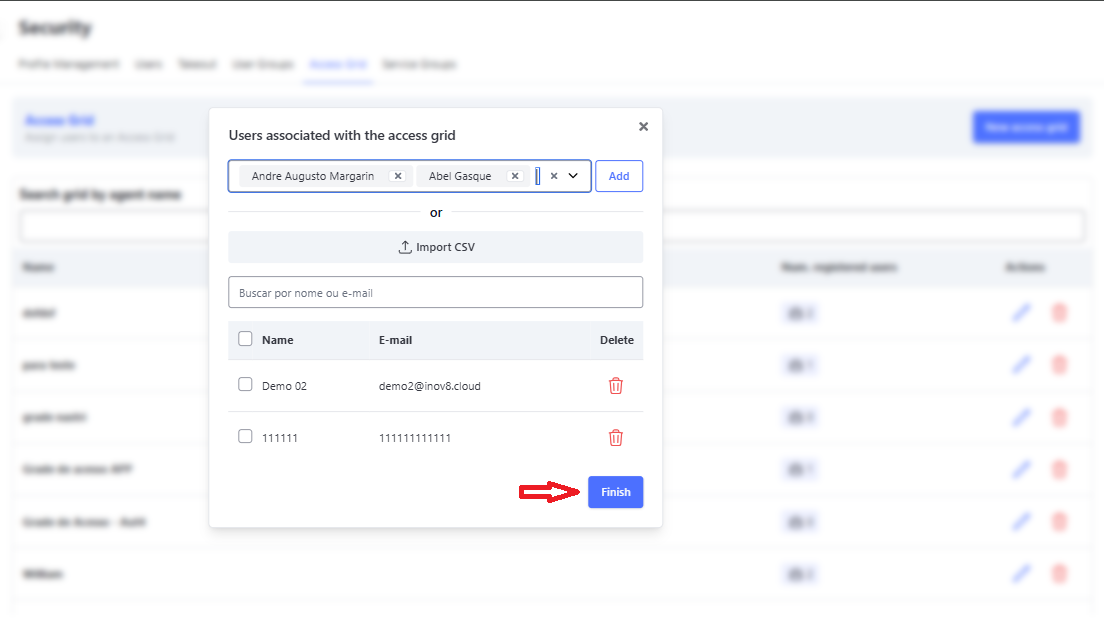
On the Access Grid management screen, you must click the icon in the "Registered Users Qty." column.
In this screen, you will be able to view and manage the users already registered in the access Grid.
To add new users, simply click the "Add Users" button, search by the user’s name, and then click "Add". You can search and add as many users as needed at once. After that, just click "Finish", returning to the previous screen and clicking "Finish" again.
⚠️ Important: Only active platform users will be displayed in the search list for new additions to the access grid.
💡 Note: If a user who is already linked to an access grid is deactivated in the system, they will be automatically removed from the respective grid.
Adding Users to the Access Grid
🚀 How to Use in Practice
- In the settings menu, navigate to the Access Grids screen.
- In the search field, select the User filter.
- Type the name of the desired employee so that the system displays only the grid to which they are actively linked.
Automatic Transfer of Services
When the Automatic Transfer of Services option is enabled, the system checks users who are logged out and outside the access Grid configured in the Access Grid module. If these users have active services on screen, the system will automatically transfer them back to their original queues.
⏱️ Execution Rule: The transfer process occurs automatically 5 minutes after the user clicks the logout button.
🚧 Prerequisite
Required Activation: For this functionality to be available in the company settings, it is mandatory to open a support ticket with N3 Support.
The parameter release within the organization is handled internally and must be requested before attempting to configure the rules.
🔄 Status Preservation
It is important to note that the system fully preserves the current status of the service during transfer, including active cases or those on Hold/Personal Queue, whether Inbound or Outbound.
The goal is to prevent customers from waiting for a response while the agent is unavailable (e.g., end of shift), ensuring they are redistributed to other available operators with highest priority.
🚦 Distribution and Priority Rules
When the system executes automatic transfer due to logout, the following rules apply:
- Return to Queue: All active services on the agent’s screen are automatically returned to the current service queue.
- 🚀 Highest Priority (Priority 0): These services return to the queue with Priority 0.
- What does this mean? They "skip the line," positioning themselves ahead of new services to be distributed as quickly as possible.
- Tie-Breaking Criterion: If multiple services are transferred with Priority 0, the system prioritizes the one with the longest total waiting time.
Important: Scope of Priority
The priority rule respects the Media and the Service Queue. This means prioritization occurs only among competing services within the same queue:
- A WhatsApp service with Priority 0 will only take precedence over other WhatsApp services waiting in the same queue.
- It does not interfere with other service queues or other media types.
Allow Login Outside Access Schedule
The system allows users to log in normally outside the times defined in the access schedule, whether the day is active or not.
Screen: Access Schedule
Queue Without Operator Notification
This functionality acts as an active security monitoring tool, alerting supervisors whenever a service queue is left unattended during operating hours.
💡 Trigger Logic:
The system cross-checks information from the Access Schedule with the actual status of users. An alert is generated if all operators linked to that queue, who should be logged in according to the schedule, are simultaneously offline.
🔔 Alert Behavior
The system constantly monitors the status of queues. Notification behavior follows the logic of independent timers per service:
- First Notification (Detection): As soon as a queue is identified as unattended (no agents), the system sends the first alert within 2 minutes.
- Recurrence (Persistence): If the situation is not resolved, the alert repeats every 10 minutes for that specific service.
- Independence: Each service has its own cycle. If you add a new service to a user, it will be notified quickly (2-minute rule), regardless of how long other services have already been in alert.
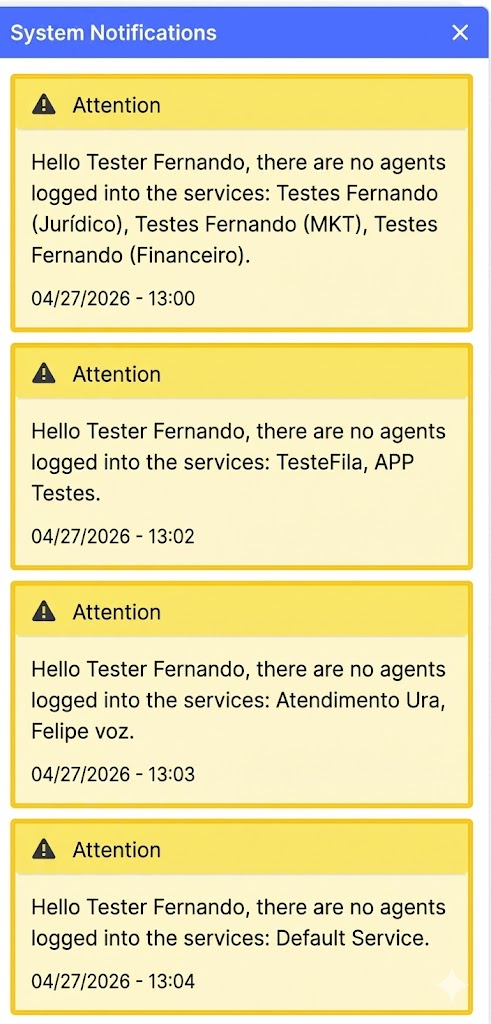
Notification Content:
- The name of the affected Queue (Service).
Floating Widget Behavior
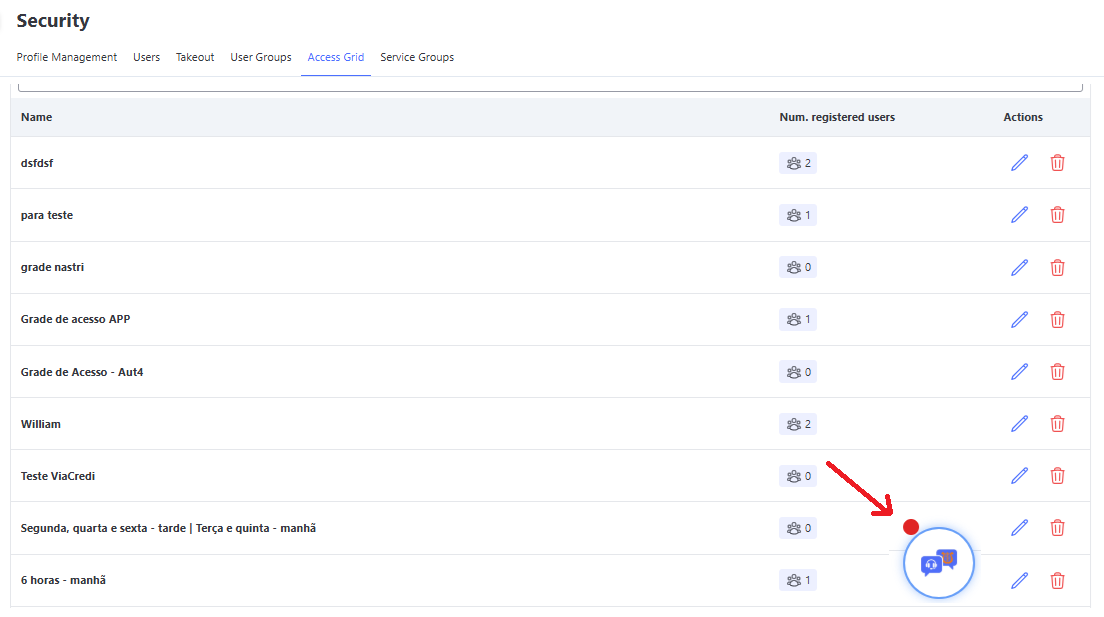
- ↘️ Initial Position: The alert icon discreetly appears in the bottom-right corner of the screen.
- 🖱️ Full Mobility: The widget is fully floating. You have the freedom to drag and position it anywhere on the screen as you prefer.
- 📩 Interaction and Reading: By clicking the icon, the alert list expands. Important: Simply opening the list automatically marks the visible notifications as read.
- ❌ Screen Cleanup: When closing the list (with all messages read), the widget disappears automatically to avoid cluttering your view.
- 📥 Accumulation: If you choose not to open the widget (or keep it open), new notifications will continue to arrive and stack in the history.
⚙️ How to Configure
To define who should receive these critical alerts:
- Access the Security menu and navigate to Access Schedule.
- Create a new schedule or click the Edit icon on an existing schedule or Create New Access Schedule.
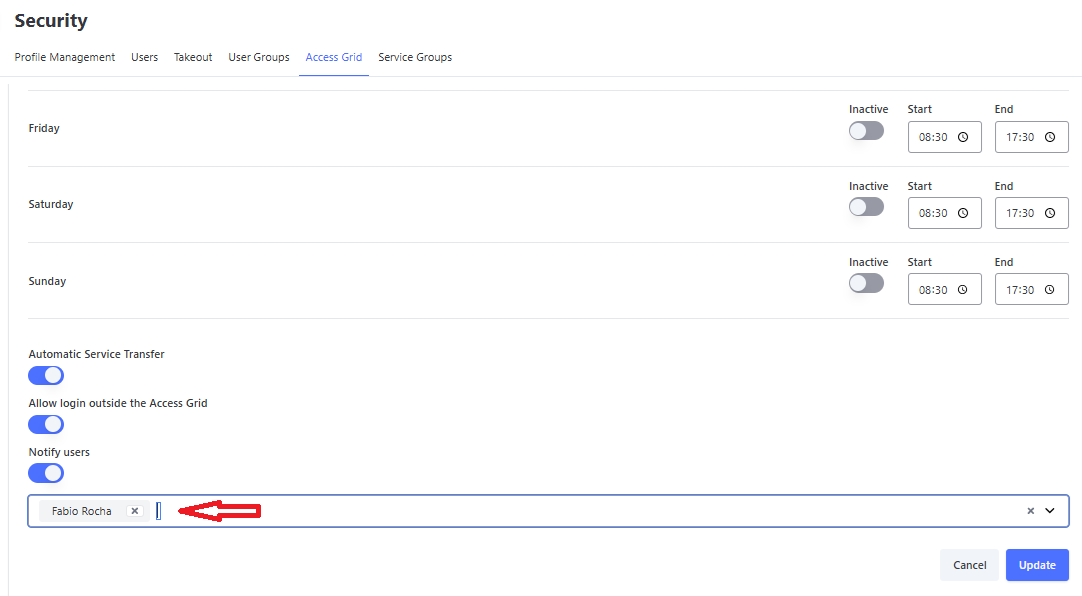
- In the settings, locate and check the option Notify Users.
- A selection field will appear listing the organization’s users. Select one or more managers who should be notified about the absence of operators.
- Click Update or Save to apply the changes.
📌 Technical Note: Make sure that the queue operators are correctly linked to this Access Schedule. The system uses this link to validate whether or not someone is online.
🚀 Why use this feature?
This functionality was designed to act as a "copilot" in management, ensuring operational continuity in an intelligent way.
- 🛡️ Guaranteed Continuity: Ensure that your customers are served even during unforeseen events, shift changes, or breaks between schedules.
- ⚡ Proactive Management: The system works for you. Instead of requiring constant visual monitoring, the platform actively notifies you when something needs your attention, optimizing the manager’s time.
- 📉 Focus on Customer Experience: By avoiding unattended queues, you drastically reduce waiting time and keep service levels (SLA) healthy.
- 👁️ Automated Monitoring: The widget continuously tracks queue status in the background, alerting only when necessary, without interrupting your workflow.
Billing Grouping
📌 Objective: Allow configuration of user licenses according to the commercial conditions of your contract.
📋 Assumptions: The commercial conditions must be registered/updated in the Billings system. If not found or if you have questions, contact your CS.
Field Definitions on the Screen:
🔧 Services: List of options registered in the Billings system for user licenses. Omni reads this online when loading the screen.
👤 Users: Active users in Omni at the time the screen was loaded.
⚙️ Operation: Monthly, Omni sends login data on the first day of the following month to perform billing, using the last change made in this functionality.
❗ Important: If no personalized registration is made on this screen, login data will follow your organization’s current default.
💡 Tip: Always perform this configuration with the help of your CS, as they can assist you and avoid incorrect charges.
Permissions
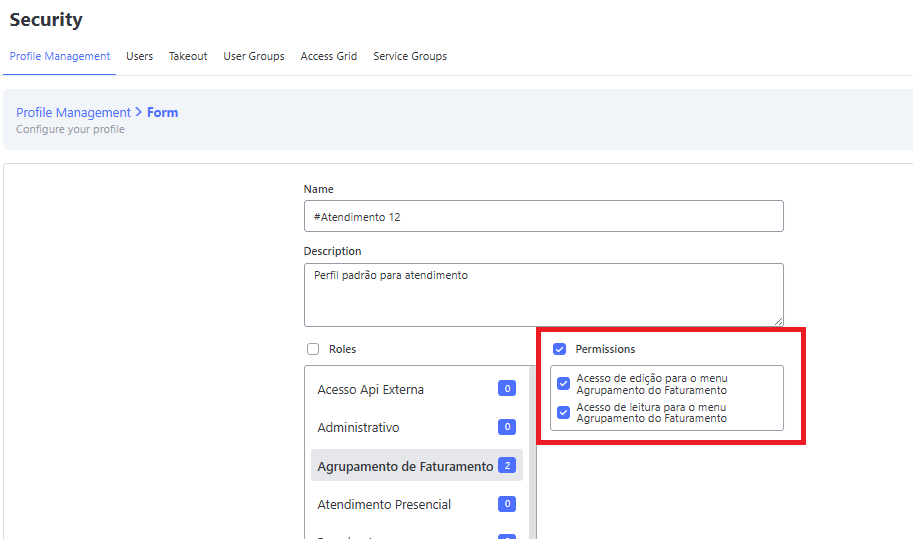
There are two profile permissions that grant access to the Billing Grouping screen:
- 👁️ Read Access – grants access only to view services and users.
- ✍️ Edit Access – grants modification access, allowing users to be associated or disassociated from services.
How to configure
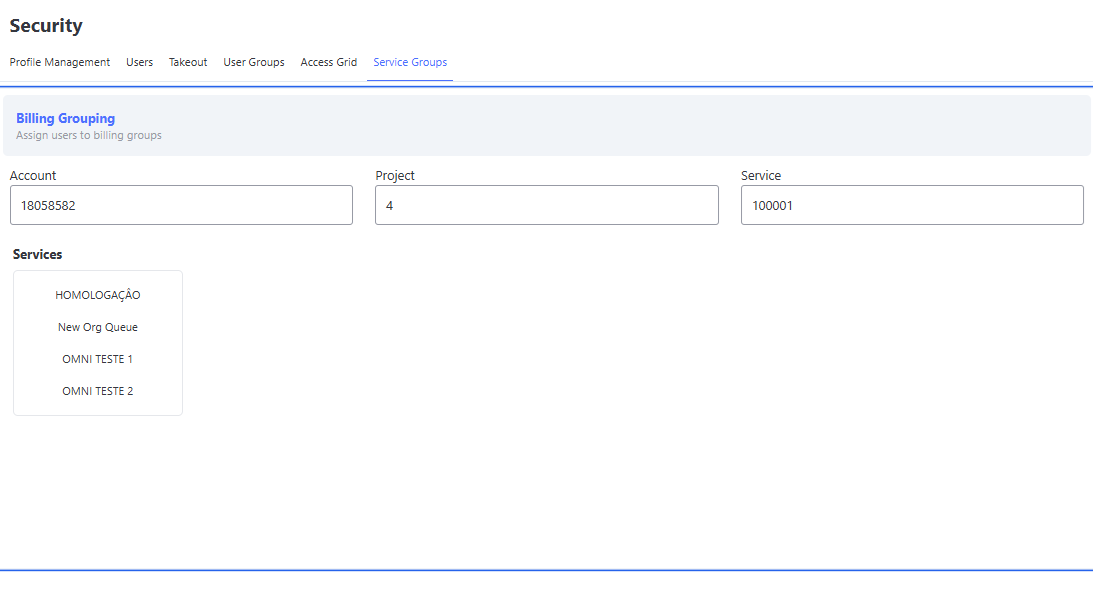
When accessing the screen, the system displays the list of available services along with the organization’s data:
After selecting one of the listed services, the system will load the users who have not yet been associated with any service, as well as the users already associated with the selected service:
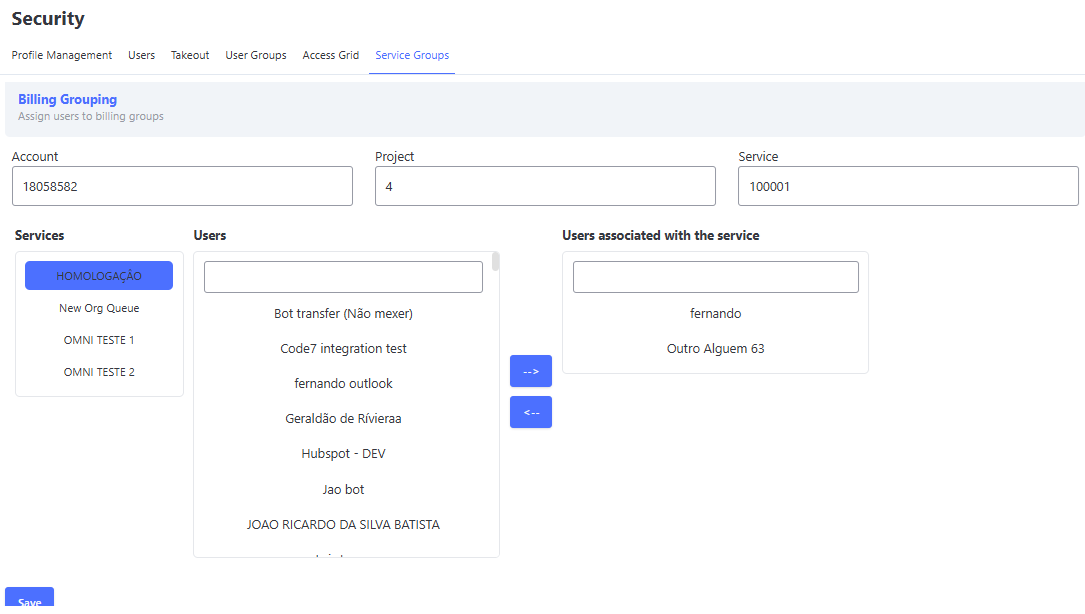
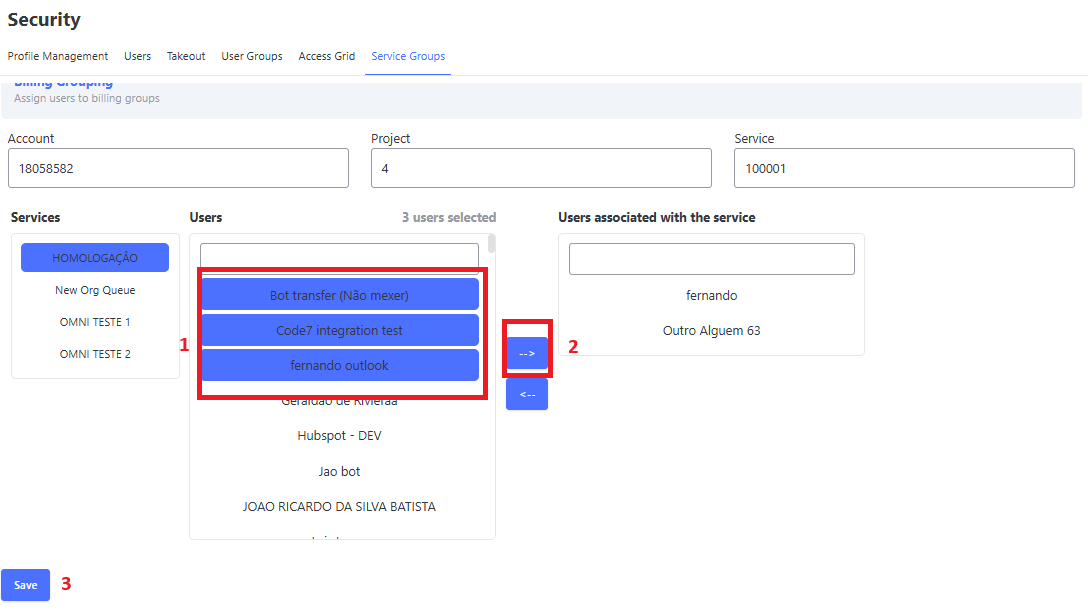
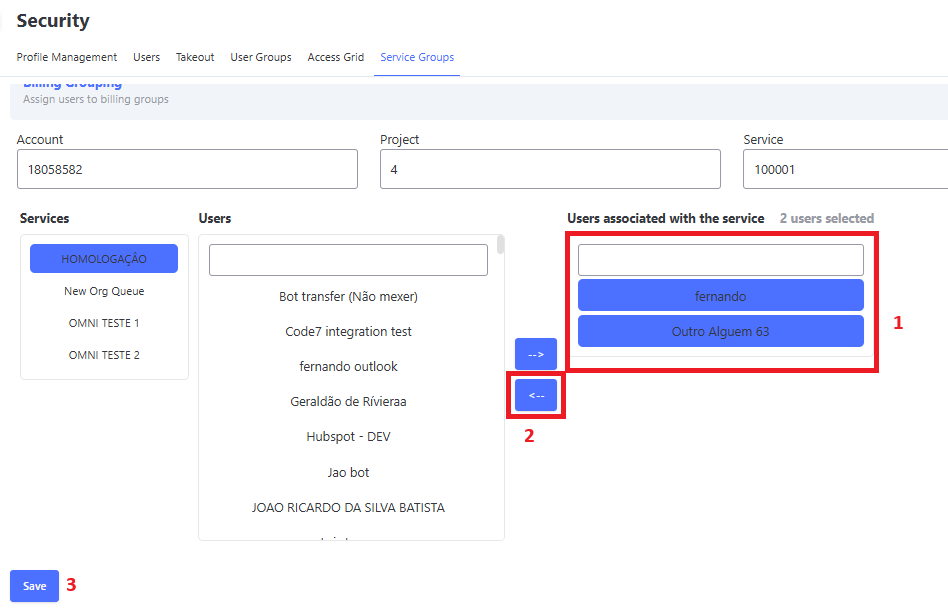
With this, it is possible to select multiple unassociated users and click the right arrow to assign them to the service, or click the left arrow to move associated users back to the unassociated list.
Finally, click Save to persist the changes made. As illustrated in the following images:
Access Blocking Due to Missing Billing Group Linkage
To ensure commercial compliance and strict control over your organization's user licenses, the Omni platform features a security lock that prevents system access for users who are not properly allocated to a billing group.
🛠️ Activation Requirement
This blocking rule operates on demand. To enable this validation for your organization, you must submit a ticket to L3 support requesting the feature enablement.
The practical blocking and disconnection effects will take effect immediately upon completion of the ticket.
⚙️ Security Lock Behavior
Once the feature is active for your organization, the system will enforce two fundamental access validation rules:
- 🚫 Block at Login: If a user attempts to authenticate on the platform and their account is not configured in any service within the Billing Grouping screen, login will be strictly denied.
- Scope of the Block: This validation occurs regardless of the authentication method used — whether via standard login (email and password registered in Omni) or integrated logins via SSO (Google and Microsoft). In any scenario, the system will display the following on-screen message:
“You do not have access permission. Your organization requires configuration in Billing Grouping. Contact your org Admin.”
- ⚡ Immediate Disconnection (Disconnect): If a user has an active session on the platform and the organization administrator removes them from a billing group (moving the user from "associated" to "unassociated" and saving the changes), the system will apply an immediate forced disconnection, logging the employee out of the platform in real time.